Have you ever tried to explain a technical problem to a family member over the phone? Or wanted to show a friend a cool trick in an app, but words just weren’t enough? In my world of accounting, precision is everything. Showing someone the exact steps to take in a piece of software is infinitely more efficient than trying to describe it.
This is where your iPhone’s hidden superpower comes into play. Many people don’t realize that a powerful screen recorder is built directly into iOS, waiting to be used. If you’ve ever found yourself searching for how to screen record on iPhone, you’ve come to the right place. This isn’t just a list of steps; this is your complete guide to mastering a tool that can save you time, frustration, and a lot of explanatory text messages.
From a practical, value-focused perspective, knowing how to use your device’s native features is like finding money in your budget you didn’t know you had. It’s a free, powerful asset. In this guide, we’ll cover everything from the initial one-time setup to recording with your voice, and even some quick editing tricks.
Part 1: The First-Time Setup (Adding the Tool to Your Kit)
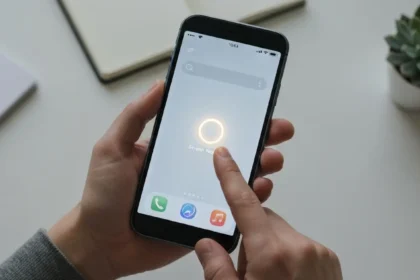
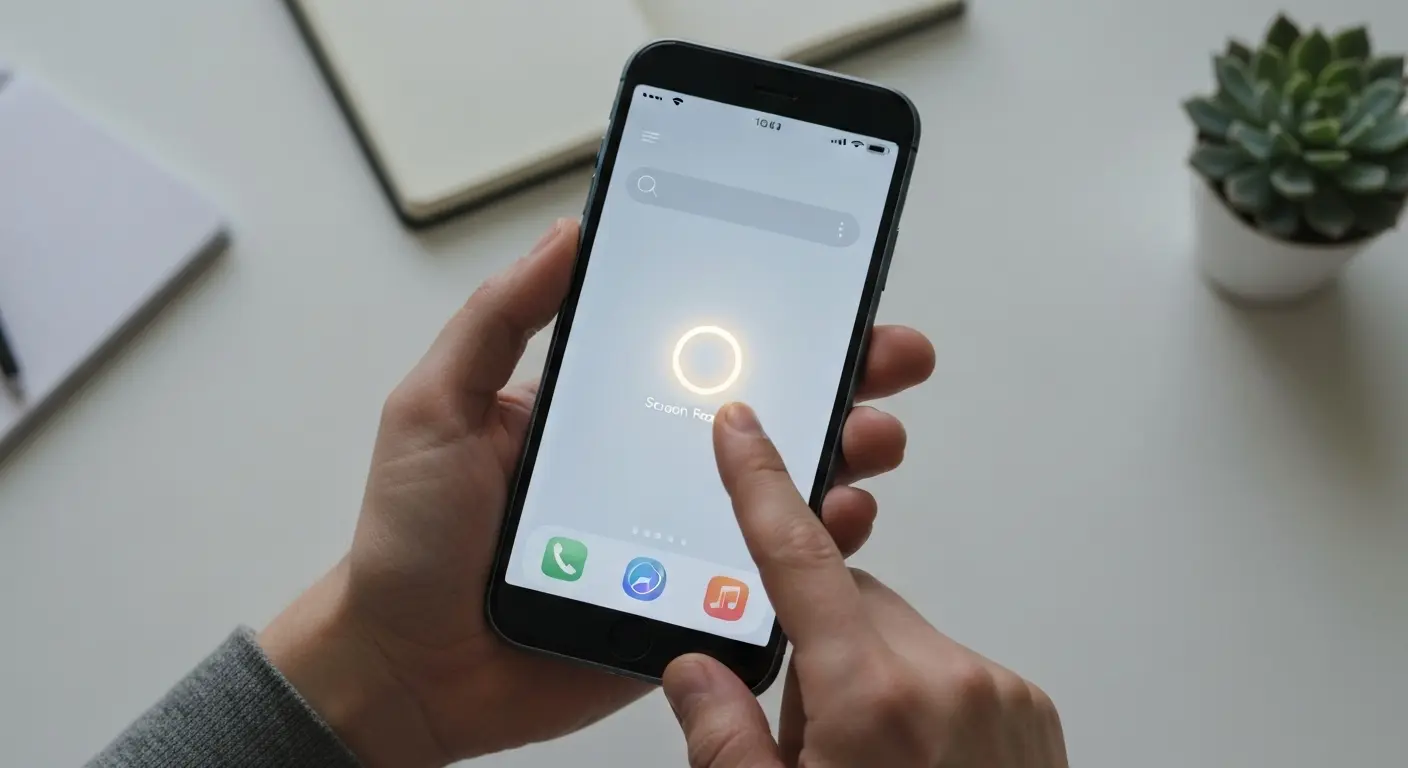
“Before you can start recording, you need to make the tool accessible. If you’re wondering how to screen record on iphone, start by making the screen record button easy to reach. By default, the screen record button is hidden away. Our first step is to add it to your Control Center—the menu you access by swiping down from the top-right corner of your screen (or up from the bottom on older iPhones).
Think of this as a one-time setup cost with a permanent return on investment. You only have to do this once.”
- Open the Settings App: Find the grey gear icon on your home screen and tap it.
- Navigate to Control Center: Scroll down a bit and tap on “Control Center.”
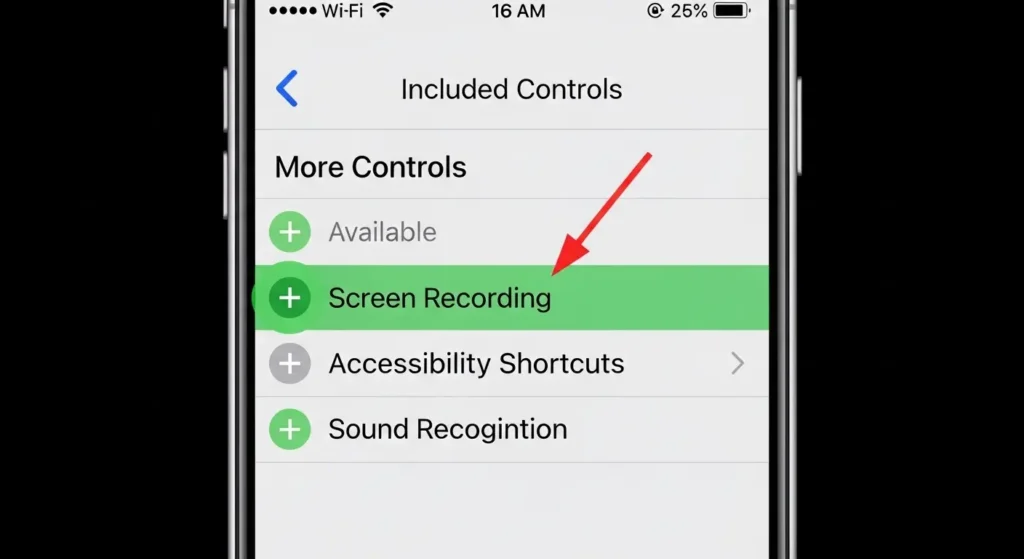
- Find “Screen Recording”: You’ll see two lists: “Included Controls” and “More Controls.” Scroll down to the “More Controls” list. The items are alphabetized, so look for “Screen Recording.”
- Add it to Your Controls: Tap the green plus icon (+) next to “Screen Recording.” This will immediately move it up to the “Included Controls” list.
That’s it. You’ve now permanently added the screen record button to your Control Center, ready for action at a moment’s notice.
Part 2: How to Screen Record on iPhone: The Core Process
With the setup complete, the actual recording process is incredibly straightforward.
- Open Control Center: On an iPhone with Face ID (iPhone X and later), swipe down from the top-right corner of the screen. On an iPhone with a Home button (iPhone SE, iPhone 8, etc.), swipe up from the bottom edge of the screen.
- Locate the Record Button: You’ll now see the new icon you added: a solid circle inside a thin-lined circle (◎).
- Start the Recording: Tap the Screen Record button. A three-second countdown will appear inside the button, giving you a moment to close the Control Center and navigate to the app or screen you want to record.
- Know You’re Recording: Once the recording begins, you’ll see a visual indicator. On newer iPhones, the time in the top-left corner will have a red background, or the Dynamic Island will show a red record icon. On older models, a red bar will appear across the top of your screen.
- Perform Your Actions: Navigate through your phone, open apps, demonstrate a process—whatever you need to capture. Everything you do on screen will be recorded.
- Stop the Recording: You have two easy ways to stop:
- The Quickest Way: Tap the red bar or red indicator at the top of your screen. A pop-up will ask, “Stop screen recording?”. Tap “Stop.”
- The Control Center Way: Swipe to open the Control Center again and tap the now-flashing red Screen Record button.
- Find Your Video: Once you stop, a notification will briefly appear at the top of your screen saying, “Screen Recording video saved to Photos.” You can find your new video file in your Photos app, ready to be viewed, edited, or shared.
Part 3: Level Up Your Recordings: Pro-Tips from The Tech Ledger
Simply recording your screen is useful, but the real power comes from a few advanced techniques. This is where you get the most value out of this built-in tool.
How to Screen Record on iPhone with Audio (Your Voice!)
This is the most common follow-up question, and it’s surprisingly simple. By default, screen recording captures the internal audio from your iPhone (like game sounds or video audio), but not your voice. To add your own narration—perfect for tutorials—you need to enable the microphone.
- Open Control Center.
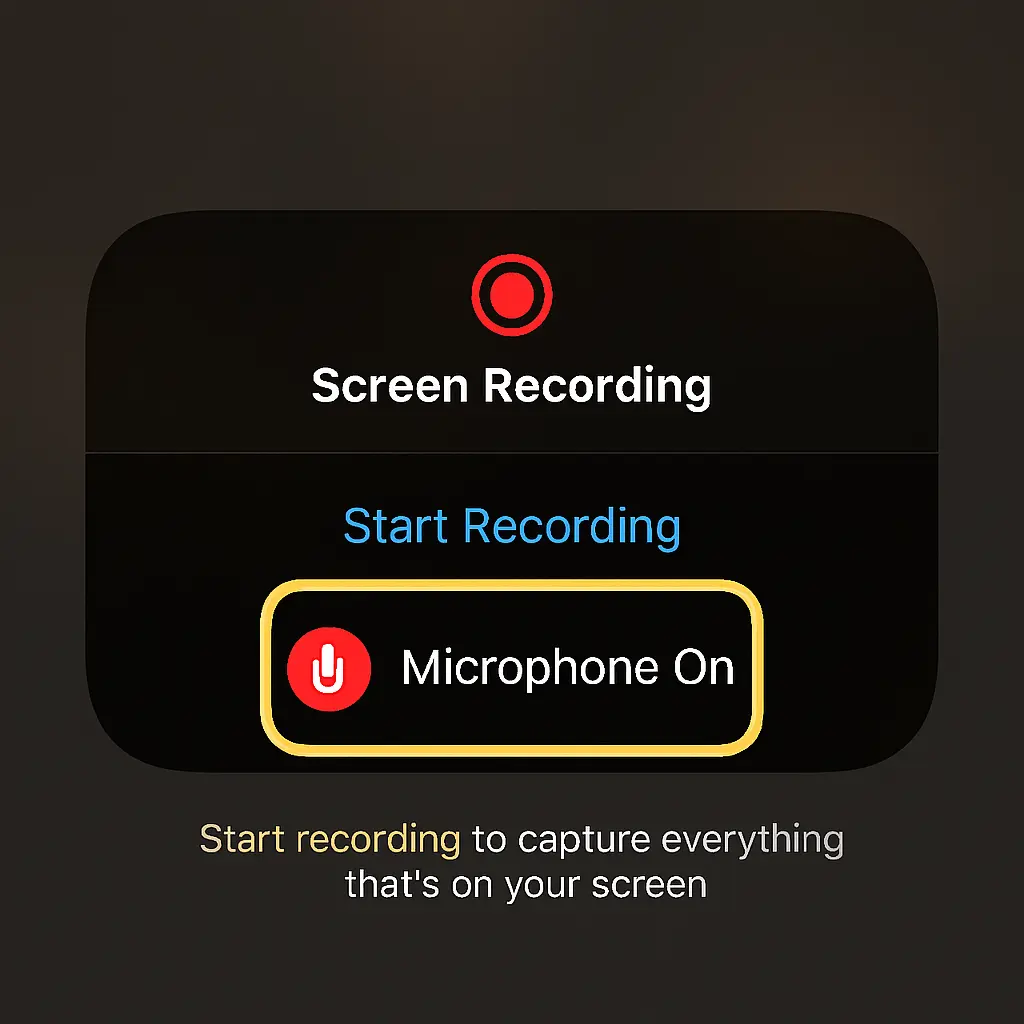
- Instead of just tapping the Screen Record button, press and hold it (or use Haptic Touch/3D Touch).
- A new menu will pop up. At the bottom, you’ll see a Microphone icon that says “Microphone Off.”
- Tap the Microphone icon to turn it on. It will turn red and say “Microphone On.”
- Now, tap “Start Recording” from this menu.
Your iPhone will now record both the internal system audio and the external audio from your phone’s microphone. Remember to turn it off when you’re done if you don’t want to record your voice next time!
Quick Edits: Trimming the Fat
From an accountant’s perspective, efficiency is key. Your raw recordings will inevitably include the fumbling at the beginning (opening Control Center) and the end (stopping the recording). There’s no need for a fancy video editing app to clean this up.
- Open the Photos app and find your screen recording.
- Tap on the video, then tap “Edit” in the top-right corner.
- You’ll see a video timeline at the bottom. Press and hold the yellow handles (chevrons) at the beginning or end of the timeline.
- Drag them inward to trim the unwanted parts.
- Tap “Done” and choose to either “Save Video” (which overwrites the original) or “Save Video as New Clip” (which I recommend, as it preserves the original file).
Managing Storage: A Key Consideration
Let’s talk assets and liabilities. Your iPhone’s storage is a finite asset. Video files, especially long, high-resolution screen recordings, can be a significant liability on that asset. A 10-minute recording can easily consume several hundred megabytes. Always be mindful of this:
- Record Only What You Need: Keep your recordings concise.
- Trim Relentlessly: Use the editing tip above to shave off unnecessary seconds.
- Clean Up: Once you’ve shared the video and no longer need it, delete it from your Photos app (and then from the “Recently Deleted” folder to fully reclaim the space).
Part 4: Practical Use Cases: When is Screen Recording Your Best Tool?
If you’ve just learned how to screen record on iphone, here’s where it really pays off:
- Tech support in seconds: Show a friend or client the exact taps to fix a setting.
- Bug reports: Reproduce an issue on camera and send the clip to app support/devs.
- Training and onboarding: Create 30–60 second SOPs for teammates; add mic narration.
- App demos and UX feedback: Walk through flows, timing, and gestures for designers.
- Education and tutoring: Explain a concept in Notes or Safari with a quick voiceover.
- Gaming highlights: Capture wins, combos, or step-by-step strategies.
- Documenting workflows: Record how to add a card to Wallet, pay a bill, or book travel (avoid capturing sensitive info).
- Social micro-tutorials: Turn step-by-step tips into short, shareable clips.
Quick note: Prefer a single screenshot for static info, get consent when recording anything personal, and remember some apps block recording due to DRM.
Part 5: Frequently Asked Questions (FAQ) & Troubleshooting
Even the best tools have their quirks. Here are answers to some common issues.
- Q: Why is there no sound in my screen recording?
- A: There are a few possibilities. First, ensure your iPhone’s Silent Switch isn’t on and the media volume is turned up. Second, if you’re trying to record your voice, make sure you’ve enabled the “Microphone On” setting as described above. Finally, some apps (like streaming services) may block audio recording due to copyright.
- Q: Can I screen record a phone call or FaceTime call?
- A: You can record the video portion of a FaceTime call, but for privacy reasons, iOS often blocks the audio from being recorded natively during phone or FaceTime calls. Be aware of consent laws in your region; recording conversations without permission can be illegal. For more on this, it’s best to consult Apple’s official documentation.
- Q: My screen recording stopped on its own. Why?
- A: This usually happens for one of three reasons: you ran out of storage space, your iPhone’s battery got critically low, or you received a phone call, which automatically stops a recording.
The Bottom Line
“Wondering ‘how to screen record on iphone’? The ability to screen record on your iPhone is one of the most practical, underutilized features built into the device. It’s a powerful communication tool that transforms you from telling someone what to do to showing them. By adding it to your Control Center and mastering the simple trick for audio recording, you’ve added a valuable, no‑cost asset to your digital toolkit.
What’s the most creative or helpful way you’ve used screen recording on your iPhone? Share your stories in the comments below.”
for more visit our category : How to Guide